
QuestDB#
This tutorial will show you how to get a QuestDB instance up and running locally to test JupySQL. You can run this in a Jupyter notebook.
Pre-requisites#
To run this tutorial, you need to install following Python packages:
%pip install jupysql pandas pyarrow --quiet
Note: you may need to restart the kernel to use updated packages.
You also need a PostgreSQL connector. We recommend using psycopg2. The easiest way to install it is via:
%pip install psycopg2-binary --quiet
Note: you may need to restart the kernel to use updated packages.
You also need Docker installed and running to start the QuestDB instance.
Start QuestDB instance#
We fetch the official image, create a new database, and user (this will take 1-2 minutes):
%%bash
docker run --detach --name questdb_ \
    -p 9000:9000 -p 9009:9009 -p 8812:8812 -p 9003:9003 questdb/questdb:7.1
0322c413699420adb1ccb136bc602d0a6514276df34778c90e60cf423ab8aac6
Our database is running, let’s load some data!
Load sample data#
Now, let’s fetch some sample data. We’ll be using the Penguins dataset:
import urllib.request

urllib.request.urlretrieve(
    "https://raw.githubusercontent.com/mwaskom/seaborn-data/master/penguins.csv",
    "penguins.csv",
)
('penguins.csv', <http.client.HTTPMessage at 0x2dda0ff3810>)
Let’s create a new table penguins in our QuestDB instance and load this csv file into it (this will take about a minute)
import requests

with open("penguins.csv", "rb") as csv:
    file_data = csv.read()
    files = {"data": ("penguins", file_data)}
    response = requests.post("http://127.0.0.1:9000/imp", files=files)
Query#
Now, let’s start JupySQL, authenticate and start querying the data!
%load_ext sql
The sql extension is already loaded. To reload it, use:
  %reload_ext sql
Create a new connection using psycopg2
import psycopg2 as pg

engine = pg.connect(
    "dbname='qdb' user='admin' host='127.0.0.1' port='8812' password='quest'"
)
Initialize the connection
%sql engine
Important
If the cell above fails, you might have some missing packages. Message us on Slack and we’ll help you!
Note
QuestDB now supports a connection string via sqlalchemy:
%sql postgresql+psycopg2://admin:quest@localhost:8812/qdb
Let’s run our first queries to count and fetch some data
%%sql
SELECT COUNT(*) FROM penguins
*  "<connection object at 0x000002DD9FE81CF0; dsn: 'user=admin password=xxx dbname=qdb host=127.0.0.1 port=8812', closed: 0>"
1 rows affected.
| count |
|---|
| 344 |
%sql select * from penguins limit 5
*  "<connection object at 0x000002DD9FE81CF0; dsn: 'user=admin password=xxx dbname=qdb host=127.0.0.1 port=8812', closed: 0>"
5 rows affected.
| species | island | bill_length_mm | bill_depth_mm | flipper_length_mm | body_mass_g | sex |
|---|---|---|---|---|---|---|
| Adelie | Torgersen | 39.1 | 18.7 | 181 | 3750 | MALE |
| Adelie | Torgersen | 39.5 | 17.4 | 186 | 3800 | FEMALE |
| Adelie | Torgersen | 40.3 | 18.0 | 195 | 3250 | FEMALE |
| Adelie | Torgersen | None | None | None | None | None |
| Adelie | Torgersen | 36.7 | 19.3 | 193 | 3450 | FEMALE |
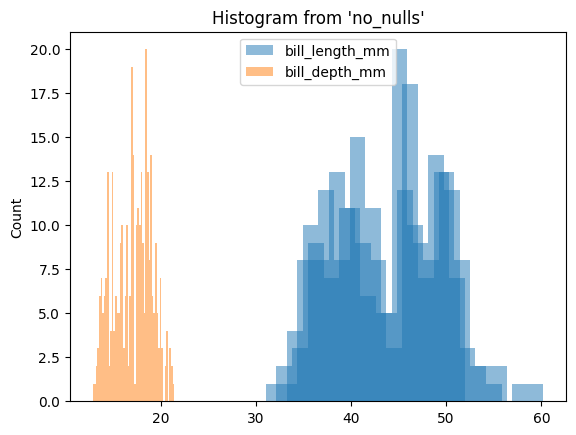
Plotting#
To utilize JupySQL ggplot API, it is crucial to have valid data, so let’s remove null values.
%%sql --save no_nulls --no-execute
SELECT *
FROM penguins
WHERE body_mass_g IS NOT NULL and
sex IS NOT NULL
*  "<connection object at 0x000002DD9FE81CF0; dsn: 'user=admin password=xxx dbname=qdb host=127.0.0.1 port=8812', closed: 0>"
Skipping execution...
from sql.ggplot import ggplot, aes, geom_histogram

(
    ggplot(
        table="no_nulls",
        with_="no_nulls",
        mapping=aes(x=["bill_length_mm", "bill_depth_mm"]),
    )
    + geom_histogram(bins=50)
)
<sql.ggplot.ggplot.ggplot at 0x2dda0364910>
Clean up#
! docker container ls
CONTAINER ID   IMAGE                 COMMAND                  CREATED          STATUS         PORTS                                                                                            NAMES
0322c4136994   questdb/questdb:7.1   "/docker-entrypoint.…"   10 seconds ago   Up 9 seconds   0.0.0.0:8812->8812/tcp, 0.0.0.0:9000->9000/tcp, 0.0.0.0:9003->9003/tcp, 0.0.0.0:9009->9009/tcp   questdb_
%%capture out
! docker ps -a -q --filter="name=questdb" --quiet
container_id = out.stdout.strip()
print(f"Container id: {container_id}")
Container id: 0322c4136994
! docker container stop {container_id}
0322c4136994
! docker container rm {container_id}
0322c4136994
! docker container ls
CONTAINER ID IMAGE COMMAND CREATED STATUS PORTS NAMES